FGCExamples
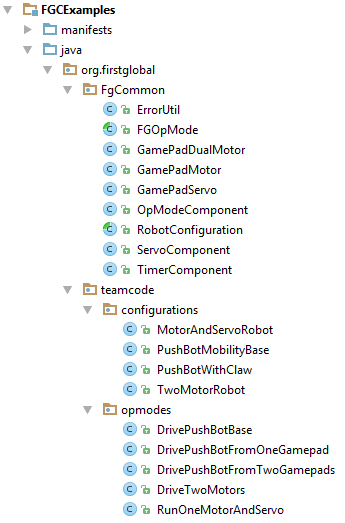
The FGCExamples project directory is shown below:

You will see that the FGCExamples teamcode package is split into configurations and opmodes. They use configurations to store information about the robot and the opmodes use a configuration to control the robot. In this way you can re-use a configuration of a robot to create different OpModes.
In this tutorial we will follow the FGCExamples lead and create a configuration for EskyBot
FGOpMode
The FGOpMode class extends the LinearOpMode we used in Tutorial 1.
/**
 * OpMode Abstract class that offers additional abstraction for opMode developers
 * including catch-all error handling
 */
public abstract class FGOpMode extends LinearOpMode {
It overrides the runOpMode() method and adds some error handling to catch exceptions and send the information to the Driver Station and continues running. This is important because _any _exception thrown in the stock runOpMode causes the OpMode to exit. This can save a lot of time trying to work out what threw the exception - you can just try again, without having to restart.
To use the FGOpMode class you must provide implementations for onInit() and activeLoop(). You can also override onStart() to do one off operations after start is pressed.
The new runOpMode() method does the same things we did in Tutorial 1 with LinearOpMode. You can see where onInit(), onStart() and activeLoop() are called below. Note that we no longer need to call telemetry.update() or idle() this is done for us.
    @Override
    public void runOpMode() throws InterruptedException {

        try {
            setup();
            onInit();
        } catch (Throwable e) {
            ErrorUtil.handleCatchAllException(e, telemetry);
        }

        waitForStart();

        onStart();

        while (opModeIsActive() && !operationsCompleted) {

            try {
                activeLoop();
            } catch (Throwable e) {
                ErrorUtil.handleCatchAllException(e, telemetry);
                ;
            }

            telemetry.update();
            idle();
        }

        //wait for user to hit stop
        while (opModeIsActive()) {
            idle();
        }
    }
RobotConfiguration implementation
The RobotConfiguration class can be extended to create saved configurations of the the Robot. EskyBot is a simple two motor robot and the FGCExamples project has a TwoMotorRobot class.
public class TwoMotorRobot extends RobotConfiguration {

    //motors
    public DcMotor motor0;
    public DcMotor motor1;

    @Override
    protected void init(HardwareMap hardwareMap, Telemetry telemetry) {

        setTelemetry(telemetry);

        motor0 = (DcMotor) getHardwareOn("motor0", hardwareMap.dcMotor);
        motor0.setDirection(DcMotorSimple.Direction.REVERSE);

        motor1 = (DcMotor) getHardwareOn("motor1", hardwareMap.dcMotor);
    }
The configuration has public access class variables for each motor, which are initialised in the init() method.
FGOpMode implementation
The FGCExamples project has an FGOpMode which uses the TwoMotorRobot
@TeleOp (group = "TwoMotorRobot")
//@Disabled
public class DriveTwoMotors extends FGOpMode {

    private TwoMotorRobot robot;
    private GamePadMotor  leftWheel;
    private GamePadMotor  rightWheel;

    /**
     * Implement this method to define the code to run when the
     * Init button is pressed on the Driver station.
     */
    @Override
    protected void onInit() {
        robot = TwoMotorRobot.newConfig(hardwareMap, telemetry);
    }

    /**
     * Implement this method to define the code to run when the
     * Play button is pressed on the Driver station.
     * This code will run once.
     */
    @Override
    protected void onStart() throws InterruptedException {
        super.onStart();
        leftWheel = new GamePadMotor(this,  gamepad1, robot.motor0, GamePadMotor.Control.LEFT_STICK_Y);
        rightWheel = new GamePadMotor(this,  gamepad1, robot.motor1, GamePadMotor.Control.RIGHT_STICK_Y);
    }

    /**
     * Implement this method to define the code to run when the
     * Start button is pressed on the Driver station.
     * This method will be called in a loop on each hardware cycle
     */
    @Override
    protected void activeLoop() throws InterruptedException {

        //update the motor with the gamepad joystick values
        leftWheel.update();
        //update the servo with the gamepad y/a button values
        rightWheel.update();
    }
}
We'll go through it bit by bit.
The @TeleOp Annotation is required for it to appear in the TeleOp Menu on the Driver Station. Although it should use name= instead of group=.
@TeleOp (group = "TwoMotorRobot")
//@Disabled
public class DriveTwoMotors extends FGOpMode {
Then the class variables are declared
private TwoMotorRobot robot;
private GamePadMotor leftWheel;
private GamePadMotor rightWheel;
The onInit() method creates a TwoMotorRobot instance which configures the motors.
protected void onInit() {
    robot = TwoMotorRobot.newConfig(hardwareMap, telemetry);
}
The onStart() method first calls super.onStart() this calls the FGOpMode.onStart() method.
It then sets up the game controller and maps the gamepad 1 left and right joystick to the left and right motor respectively.
protected void onStart() throws InterruptedException {
    super.onStart();
    leftWheel = new GamePadMotor(this, gamepad1, robot.motor0, GamePadMotor.Control.LEFT_STICK_Y);
    rightWheel = new GamePadMotor(this, gamepad1, robot.motor1, GamePadMotor.Control.RIGHT_STICK_Y);
}
The activeLoop() then just updates the power for each motor based on the joystick values
protected void activeLoop() throws InterruptedException {
    //update the motor with the gamepad joystick values
    leftWheel.update();
    //update the servo with the gamepad y/a button values
    rightWheel.update();
}